Category: Tech

Tech news in Android.appsapk.com, read all about the recent tech news

  • Huawei Mate 30, 30 Pro, 30 RS

    Huawei Mate 30, 30 Pro, 30 RS

    When it comes to buying a smartphone, a customer or the consumer would consider all the important factors that comprise of a smartphone or the smart electronic device. There are millions of smartphones in the market with various specifications, features, similarities and differences and of course some are better and while some are not so better for purchase.

    Most of us prefer using the cheapest and an affordable smartphone that has got loads of features that one needs to use it for their daily purpose though. However, whenever we buy a smartphone, all that we consider is just the look, design, price, and a few important features such as RAM, memory, storage, internal and external, processor, built, its upgrades, etc

    Huawei Mate 30

    Well, you need to know that there is one such brand known as Huawei in the smartphone market that helps us with loads of benefits and features at the most affordable price though. However, even this particular brand has got a few different and variety of smartphone or probably the successor of previous phones and devices.

    You just have to look for the perfect smartphone that will come under your budget and of course with all the features and specifications that you are expecting.

    Here we have mentioned some similarities and differences about three models from the same brand Huawei, which is Huawei Mate 30, Huawei Mate 30 Pro and Huawei Mate 30 RS that consists of the Porsche designs overall. Just refer to the below-mentioned details and look forward to buying the best model for you

    Huawei Mate 30 vs. 30 Pro vs. Huawei Mate Pro 30 RS Porsche Design

    However, to help you better, we have gathered loads of information and have compared the smartphones with all of its best features and differences and of course with the prices too. Just refer and get the right piece. I hope the below things will be supportive of the people who all are looking for a long time.

    Display and Look

    The make of all the three smartphones is quite similar but there are a few differences that could differentiate from each other, otherwise, they are like identical twins. The front of Huawei Mate 30 and 30 Pro can be figured out with the front notches that both the smartphones have.

    Huawei Mate 30 Display and Look

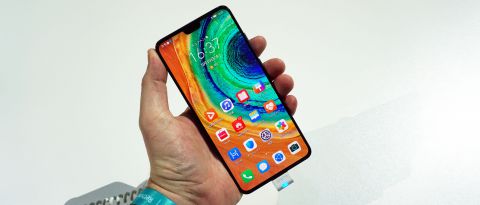
    The displays are quite different from each other and when it comes to the Huawei Mate 30 RS Porsche design is actually divided into parts in the back panel. There is leather on the right side and glass in the middle area.

    Resolution

    The 3D facial recognition is something that you would find in the Mate 30 Pro and there is no such feature or an additional feature in the Mate 30 or in the Mate pro 30 RS Porsche design though. You simply can decide if you need a facial recognition device or just the normal model.

    The resolution of Mate 30 is quite high powered than Mate Pro 30 and even RS Porsche design has got an extraordinary resolution that one can be impressed for sure. You will see a 409ppi pixel density in the pro version and 338ppi in the Mate 30 version. Porsche Design has got the same pixel density of Mate 30 Pro.
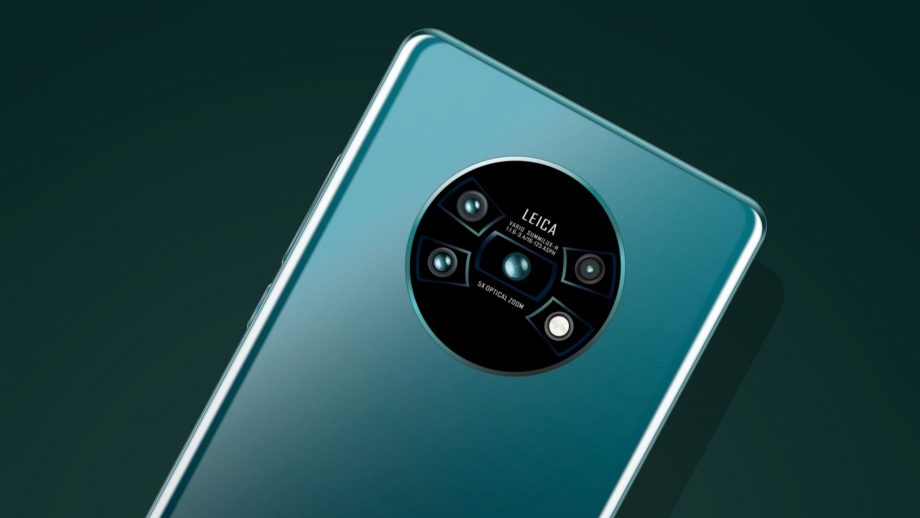
    Camera

    The Huawei Mate 30 has got a triple rear camera whereas the Huawei Mate 30 Pro has got Cine Camera and a Quad rear camera. You will see that the pro model has got 3D sensors that can also work as the best feature for face recognition too.

    Huawei Mate 30, 30 Pro, 30 RS camera

    You can, not just use it for videography even for the slow-motion shots too. Porsche Design has again the Quad camera, with 3x optical zoom, with 32 MP Wide, LED, panorama, HDR and few extra features have been added as compared to Mate 30 and Pro 30.

    5G specialty

    When it comes to the connectivity and the network you can simply go on with the Mate 30 if you need 4G connectivity and if you are looking for 5G facilities then you can opt for Mate 30 Pro and 30 RS Porsche design that supports 5G LTE as well. Along with 5G, it also supports HSPA and GSM too.

    However, Mate 30 Pro and Porsche designs are quite expensive as compared to Mate 30 version. Well, you can choose accordingly to your needs for sure.

    Storage

    If it is about the storage, you need to know that the Huawei Mate 30 has 8GB RAM with 128 GB of storage and memory. If it’s about Huawei Mate 30 Pro has got 8GB of RAM along with 256 GB of ROM. When it comes to Mate 30 RS Porsche Design has got 12GB RAM and 512GB of ROM which is expandable up to 256 GB in the shared sim memory.

    Battery

    You will see that the Huawei Mate 30 comes with a great battery capacity that covers up to 4200mAh battery capacity and of course with a quick charger too. When it comes to Mate 30 Pro and RS Porsche Design from Huawei comes with 4500mAh battery capacity for sure. However, the pro version offers a little extra life as compared to the standard Mate 30 model.

    Cost

    Well, the device has not yet been launched and is soon to be arriving in the online electronic portals and websites. However, the experts are predicting Mate 30 to be in the range of Rs. 63,000, whereas the 30 Pro and RS Porsche Design would be approximately in the range of Rs. 72,000 and Rs. 165,000 respectively!

    Well, there may be some discounts or offers served for the first time buyers or the first customers, you can simply try for sure.

    Conclusion

    Hence, here we have compared all the specifications and features of all the three smartphones from the brand of Huawei which would be a great handset soon. You can simply decide and choose on which device to buy for your use. Just go through the comparison!

  • How to get a free VPN video with Orbot app

    How to get a free VPN video with Orbot app

    We all experienced the frustration of Geo location limitation with online services and wanted to bypass it in some way. Well, now you can do it easily with the new cool Orbot app which will grant you a full internet freedom in all that comes to hiding your ip from the web browsers.

    For more information about the app you can read the full review of Orbot app for android here and if you want to download the app you can do it easily as well.

    We hope you enjoy the video!

  • Xiaomi Redmi Note 6 Pro – Detailed Review

    Xiaomi Redmi Note 6 Pro – Detailed Review

    Since 2014, Xiaomi has come a long way, from just a native Chinese electronics company to one of the world’s largest smartphone manufacturers. Today the brand has brought a range of devices to Western Europe and the UK, and Xiaomi Redmi Note 6 Pro is no exception.

    Xiaomi Redmi Note 6 Pro – Detailed Review

    Starting from $180, Note 6 Pro features 4GB of RAM, 64GB storage (with microSD card slot), 4000mAh battery, and Snapdragon 636 Octacore SoC. It seems this device has been designed to compete against several arch-rivals. With a brand having tough rivalry against the likes of Motorola, Huawei, Honor, Oppo and Realme and not having much market share in the west, will Redmi Note 6 Pro succeed in the market?

    Price and Availability

    You can buy Redmi Note 6 Pro (4GB RAM/64GB storage) directly through Amazon for $180. You can also buy the 3GB/32GB variant through the official UK website of Xiaomi for £219. It is available as an unlocked global version in the US.

    Key Specs of Xiaomi Redmi Note 6 Pro

    The selfie features are the great selling points in a lot of Chinese smartphones. Xiaomi followed the same footsteps by launching Note 6 Pro with two front-facing and two rear cameras.

    It features 20MP selfie cameras with a 2MP depth sensor. It has several beauty filters and AI modes. On the rear side, it boasts a 12MP main lens with f/1.9 aperture and a 5MP depth sensor.

    Key Specs of Xiaomi Note 6 Pro

    It also has an IR blaster to use with Mi Remote app that can control various appliances in your home, as well as a stylish notch design on its display. It has a 19:9 aspect ratio on the screen and is 6.26 inches tall with 1080x2280p resolution.

    Xiaomi Note 6 Pro has also brought a sturdy design with a plastic frame and metal rear panel. It adds a premium look and feels for the price.

    Design

    In this day and age, an average customer expects glass design and tear-drop or water-drop notch even at the budget segment. Irrespective of this, Xiaomi Redmi Note 6 Pro is here with a large notch and metal build.

    The metal black plate is nice to touch and the sides are made of plastic. It has a fingerprint sensor on the rear and “ Mi” logo with a rear camera.

    Design

    Along with a dedicated MicroSD card slot and dual SIM tray, the left side looks clean. It has a volume rocker and power button on the right and micro USB slot on the bottom.

    It has a noise-cancellation microphone, 3.5mm headphone jack and IR blaster on the top. The front holds the dual front cameras in a wide notch and 1080x2280p display with a 19:9 aspect ratio.

    Display

    In the era of punch-hole cameras and teardrop notches, the wide notch feels a bit old-fashioned but it eventually fades in the background in daily use. In moderately bright sunlight, it goes bright enough to use and the large display shows a lot of content at once.

    Xiaomi Note 6 Pro Display

    It gives a decent experience of watching videos on the go. The screen displays pleasing and vibrant colors. The display ticks all the checkboxes for the price as it is sharp, bright and vivid.

    Battery

    When battery capacities starting to stay constant or shrink on many devices over the years, we were quite intrigued by the 4000mAh battery in Redmi Note 6 Pro. For large capacity, it can easily last all day.Battery

    In real life, after charging at 8:00 AM, enjoying music and videos on 45-minute of a bus ride, answering emails and messages all day, and taking calls for an hour, and doing some things when coming back, the device had around 65% of juice left at 8:00 PM.

    Even though it doesn’t come with a fast charger out of the box, it’s also worth keeping in mind that it does support fast charging by Qualcomm.

    Camera

    No matter how powerful and well-built the inner components of the device are, almost every device relies on their cameras. So, it goes without saying that Xiaomi Redmi Note 6 Pro has some nice and capable lenses.

    It features a 20MP front camera with f/2.0 aperture and a 2MP depth sensor with f/2.2 aperture. There is a 12MP main lens on the back with f/1.9 aperture and 5MP depth sensor with f/2.2 aperture and a range of AI improvements.Xiaomi Note 6 Pro Camera

    With the vertical swipes, you can access several modes and it opens quick toggle features on the left. AI is turned on and HDR is set to “Auto” by default. The picture quality is pretty good or the price and details are good enough.

    Interface

    One of the major problems with buying Chinese smartphones is that they have a bulk of software skins for a lot of additions and features. For example, the device doesn’t show notifications when locked.

    Interface

    After installing the apps, the home screen is filled before filling into infinity or right with no order. You can fix it by installing a launcher or going to Settings. Basically, it runs on Android 8.1 based on MIUI.

    Pros

    • Large, bright display
    • Nice camera
    • Long battery life

    Cons

    • No NFC
    • A traditional micro USB port

    Verdict

    If you are a power user who needs all the bells and whistles with a look of flagship smartphone without paying very much, Redmi Note 6 Pro is your best bet. If you need the best combo of performance and battery on the go, it’s a good choice for you.

    For the price of under $200, a lot of competitors are still trying hard to offer the same value. If you want that much, Note 6 Pro should be on your checklist.

  • Moto X Pure Edition

    Moto X Pure Edition

    One reason to really like Moto X Pure Edition (Style as global version) is that it is an unlocked phone from Motorola at best price and it can work on all leading wireless carriers across the US like T-Mobile, AT&T, Sprint and Verizon. Along with it, this 5.7” successor to Moto X (2014) also promises to offer the same customization features. For example, you can choose from different materials at the backing and various trim colors. In the sea of similar devices, Moto X Pure has a great edge over the competitors.

    Moto X Pure Review

    One letdown is that it feels too bulky for smaller hands. Battery life is great, the camera is not that impressive and the services don’t have anything new, let alone some minor changes.

    Prices and Availability

    When it comes to pricing, Moto X Pure Edition comes unlocked for $400 in the US ($100 less than the launch price in last year). However, the price is subject to rising as per some design options and storage capacity. In the UK, the pricing starts at £399 for the 32GB variant and £434 for the 64GB variant.

    As Moto X Style, it is available only on contract and exclusive to Vodafone in Australia. It is offered on both AU$100 and AU$80 plans, along with monthly repayment of AU$3. For 24 months, it sums up to AU$2472 and AU$1992.

    Design

    The display of Moto X Pure has been raised by around half an inch as compared to Moto X. It is not as large as Google Nexus 6, the size bump makes it significantly bigger than Moto X which had 5.2 inches display. For some people, it may not fit in front pockets and you cannot hold it single-handedly. But it is still appealing and sturdy handset.

    Design

    The curved backing fits into your palm and glass panel curves down the side edges smoothly. Ridges are touch-sensitive on the sleep/power button and there are narrow control buttons. The viewing angle is wide enough and is responsive to touch. You won’t have any problem playing games, reading the text, streaming videos, and watching HD movies. You can choose between vibrant and normal color modes under Display.

    Software

    Unlike its name, Moto X Pure doesn’t run the “Pure” Android interface. At least, it’s not like Google Nexus series and Play Edition. But the Moto line comes very close with pure Android experience. First of all, it is unlocked and you will not get any bloatware and branding from the carrier.

    Instead, it will come with a basic set of apps by Google like Gmail, YouTube, Chrome browser, Play Store, etc. Next up, you won’t have any overlap of manufacturer’s UI over the phone like Samsung and HTC devices which have TouchWiz and Sense skins respectively. Motorola still offers some great features in the Moto app.

    Moto X Pure Software

    Some features are available from Moto apps like Actions, Moto Assist, Display, and Voice. With Assist, you can adjust device settings according to your activity and location. If you are planning a meeting with Google Calendar, it can turn to vibrate and reply to a missed call with a specific message.

    Camera

    • 21MP rear camera
    • 5MP selfie camera
    • Wide-angle front and night mode shooting camera with flash
    • 4K video recording with the rear shooter and 1080p recording from the front camera

    The default camera app doesn’t have plenty of editing features but both cameras have a touch-focus module that can easily adjust exposure, HDR (high dynamic range), digital zoom, geotagging and timer. Both cameras have flash and night mode for low-light shooting. You can take photos with a 16:9 aspect ratio or 4:3 aspect ratio.

    Moto X Pure Camera

    Both front and rear shooters can record HD 1080p video and slow-mo in 720p. You can also pause the recording and take pictures while shooting video. You can scan QR codes, take panoramic shots and scan barcodes via Google or simply copy the same on the clipboard. You can also record 4K ultra-HD video at 3840x2160p.

    Performance

    • Available in 16GB, 32GB, 64GB storage variants with expandable storage of up to 128GB
    • 3GB RAM
    • 3000mAh non-removable battery
    • Qualcomm Snapdragon 808 1.8GHz Hexa-core SoC
    • Adreno 418 600MHz GPU

    Moto X Pure Performance

    Moto X Pure Edition has come with lower clock speed as compared to its older sibling but SD 808 still operates smoothly. Despite having 3GB RAM, we haven’t face any lag while doing daily tasks like opening the camera, switching through images, apps, calling, and playing graphic-intensive games. It took around 1.38 seconds to open the native camera app and 37 seconds to turn off.

    Unlike the last two Moto X versions, Moto X Pure Edition comes with a dedicated MicroSD card slot which supports up to 128GB of memory.

    Battery

    Although Moto X Pure comes with a 3000mAh battery, it can discharge faster due to heavy usage. After surfing the web all day, making calls, and downloading apps, it has gone down to 30% by noon. We had to charge it again to last till evening.

    The device lasted around 8 hours and 45 minutes on average with consistent video playback on the battery drain test. On the other side, Moto X had a 2300mAh battery but it lasted 10 hours.

    Battery Life

    However, this handset comes with Turbo Power 25W fast charger, which juices up the battery faster. It takes around an hour and 15 minutes to charge up from 0 to 100 percent. If you can’t wait, turn it off and plug in and it will gain 20% of power within 10 minutes.

    Pros

    • A customization master – choose your own design
    • Expandable storage
    • Fast charging
    • Loud front speakers

    Cons

    • The bigger size adds bulk
    • Average battery life
    • Better options available in the market at a lower price range

    Overall

    If you want to flaunt your own style with a large smartphone that is unlocked too, Moto X Pure Edition is just nice for you. Otherwise, you can shop around. Moto X Pure Edition is a nice device for normal usage.

    The best thing is that it comes with different customization options with color accents, materials, and engravings. It can easily reflect your personality.

  • What Is Google Fi? Get All The Information Here

    What Is Google Fi? Get All The Information Here

    youIf you are an Android lover, you may definitely have heard what is Google Fi but you may not know about it fully. Since the service is now available to everyone using an unlocked Android device, there is a lot you should know. Therefore, we have come up with a detailed view of how Google Fi works and which devices support this.

    What Is Google Fi

    How Google Fi Works?

    Google Fi is a phone carrier which is operated by Google. It provides data service on 3 networks – Sprint, T-Mobile and US Cellular. Your device can easily switch between these carriers. It also makes calls and sends texts using Wi-Fi.

    How Google Fi Works

    Billing Information

    Google Fi is all about easy billing with no overages and hidden charges. You just have to pay $20 monthly for unlimited texts and calls, as well as flat $10 per GB of data you are going to use post the plan. It means you can use 6GB of extra data per month for $60.

    With unlimited plan range for Fi, you can hit the ‘Bill Protection’ level. After using 6GB data in a month, your charge is capped at $60 if you keep, getting data service the rest of the month.

    Without paying up to $80 ($20 upfront + $60 for data), you can use as much data as possible in a month. The only catch here is that your speed will slow down to 256kbps once you exceed 15GB of limit in a month.

    On the other side, you can also pay $10 for each GB you spend for full-speed data after exceeding a 15GB limit.

    Billing Information Of Google Fi

    There is no need to bear the cost of unlimited plan per month but you can secure one. If you do not use more than 6GB per month, you will not have to pay the cost of an unlimited plan.

    Your bill will be within $80, according to your usage. Bill Protection works for home usage and international data usage. It helps frequent travelers very much.

    There is also “Group Plan” available for a maximum of 6 people on Google Fi to share a billing source and a single account. All of the features are available to a single plan with a Group Plan.

    Besides, you can save $5 per month on per person with the base plan. The account owner can manage the bollings, apart from data limitations with each user.

    The data usage limits for Bill Protection are also manageable for each person. The group owner is billed collectively for everyone’s bill but also allows each member to pay their share to the account admin.

    Members do not have any contract and they can join and leave the Group Plan whenever they need.

    Google Fi Support on Your Phone

    Google Fi simply needs small software on your device and a unique SIM card, which allows you to switch between Sprint, T-Mobile and US Cellular on the go with different factors. It can do the same using an unlocked phone.

    You can use Google Fi without using an actual SIM card if you use an integrated eSIM on Google Pixel 3, 3XL, 2, 2XL, 3a and 3a XL. Also, you can use your SIM slot for another carrier whenever needed. You need to check coverage before choosing a carrier.

    Google Fi Support on your phone

    With a single SIM, you have the power of 3 different networks with a Wi-Fi network. Google Fi still depends highly on Wi-Fi along with 3 different mobile networks, whether you are around network or not. Your device will constantly look for the open Wi-Fi networks to connect using “Wi-Fi Assistant”.

    It has a database of a known and reliable network for the best connection. The connection is built through a VPN whenever it connects your device to a Wi-Fi. Hence, you will not find any change in your experience. The only difference is that you will not be paying for using mobile data.

    Texts and calls work just the way they do on mobile data with Wi-Fi and you can keep calling with your phone while switching between networks. You can also find some of the identical features using Google Fi due to which Google Voice became popular over the years.

    You can also view voicemail, forward calls you are getting on Fi number to any phone you like, send texts and make calls with that number from any device with website and Hangouts app.

    How about International Calling?

    Google Fi works globally in more than 170 countries without any additional cost for texts and data. It is one of the best things that make Google Fi stand out.

    You have to pay $0.20 per minute flat to call at any number on the cellular networks in a different country. If you are calling on Wi-Fi, you have to pay much lower. Using Wi-Fi, you can also call back home for free to the US.

    How about International Calling

    You have to pay the same amount for data you are going to use internationally, i.e. $10 per GB and Bill Protection starts post 6GB usage. However, the speed may vary as per the company you are visiting.

    We have found hiccups sometimes in LTE speeds in different countries across Asia and Europe, especially when the device switches across roaming networks.

    Best Devices for Google Fi

    When Project Fi was launched in the year 2015, it was exclusive only to Nexus 6. Things turned up eventually and it eventually supported several other phones by Motorola, Google, and LG. When the ‘Project’ status was finally over, Google Fi started supporting all unlocked devices with some limitations.

    With Google’s latest devices like Pixel 2, Pixel 3, and Pixel 3a, you can have the best experience using Google Fi. They have eSIM integrated for Fi and you can easily set up your account and connect to Fi network without inserting any SIM.

    You can also get the same experience without eSIM in other phones, which support Fi, such as Moto G6, Moto G7, LGV35, Moto X4 with Android One, and LG G7. All such devices are capable to switch between networks and move between network partners like Sprint, T-Mobile and US Cellular.

    With Google VPN, it can smoothly switch between mobile networks and available Wi-Fi hotspots.

  • Android to Mac Files Transfer – The Detailed Guide

    Android to Mac Files Transfer – The Detailed Guide

    If you are a Mac and Android Smartphone user at the same time, which is quite a different combination, but still not uncommon, you might often feel like you are isolated in the world. Even though there is no lack of Android users across the world, Macs can easily sync, work, and connect to iPhones. In this guide, we are going to discuss Android to Mac Files Transfer using different methods, such as Bluetooth and a free tool Android File Transfer.

    Android to Mac Files Transfer

    However, for interoperability, Apple may not be the most favorable company in the world. Well, there are tricks to workaround. Google’s services are very simple. So, it is very easy to sync your Android device to Mac, even though it involves a lot of steps.  If you just want to connect two devices and transfer files (especially when you want to move your photo of your device without even compressing it), you can easily use a free tool like Android File Transfer. So let’s discuss the same.

    Using Android File Transfer

    Commonly known as AFT, the Android File Transfer is available officially at Android.com and is made by Google. It can support Mac OS X 10.7 or later.

    Android to Mac Files Transfer

    Follow the instructions displayed on the screen and install the software. Double click AndroidFileTransfer.dmg file and drag icon to the Applications folder. It may ask you to authorize to run if it is your first time to launch the software.

    Connecting Android to Mac

    If your Android device is turned on and unlocked, plug it into the Mac via USB cable (if you have the original cable, especially if you have the new one or USB-C).

    Android to Mac Files Transfer

    If Android File Transfer does not open automatically when you connect to the device, you need to open it manually.

    Transfer Files

    Now you will see all the folders on your device.

    You may find all the files organized in a self-evident and a logical way with just one exception. You may want to look in a folder named ‘DCIM’ if you are searching for photos on the device itself. Also, you can look for the photos in a subfolder like Camera.

    Android to Mac Files Transfer

    Search for screenshots in the Pictures folder where you may find a subfolder named Screenshots if they are stored in the device.

    From this window, you can drag-and-drop files to the desktop. You can make new folders and manage files.

    Note – Android phones vary from function to function and you may want to make changes with settings to make your Mac detect your device as an external disc. For example, Galaxy S7 needs you to pull the notification bar down and touch USB alert to connect the same as a media device.

    The catch

    There is a catch with Android File Transfer. You cannot cut and paste items with this app. Drag and drop is the only option to transfer files. Well, it is not the issue here. A lot of MacOS users prefer to drag and drop rather than copy/paste. Well, it is the only thing you need to consider. This app makes it easier to transfer files to/from Android with simple drag and drop.

    Give a try to Android File Transfer and you will see how it makes transferring files even easier.

    Troubleshooting AFT

    Android File Transfer is a very intuitive and user-friendly tool and it has very high user’s base. However, you may often have conflicts connecting the Android device to the Mac and it may also throw up the error “Couldn’t connect to the device”.

    Well, there are different reasons and various solutions to deal with this problem. For example, if the cable is faulty, you can try another USB cable. Most of the time, you can find the solution on the notification panel above the screen.

    All you need to pull down the screen and find a note saying ‘USB charging this device’ or something like this at the bottom. Tap the same option tap again when it asks. It will ask you about the use of USB. You need to select “Transfer Files” option.

    Connecting the device wirelessly

    If you want to do it without cables, you will find a lot of tools and options to do it wirelessly. You may try SHAREit, AirDroid, or simply Dropbox for a different approach.

    Android to Mac Files Transfer via Bluetooth

    First of all, you need to turn on Bluetooth on both the Android device and Mac. Simply go to System Preferences > Bluetooth on your Mac and be sure “Bluetooth: On” message is shown. Or you can click “Turn Bluetooth On”. Now, you will see the phrase like “Now discoverable as” and quotes with the name of your computer.

    Go to Settings > Bluetooth on your Android device. Make sure it displays your Mac on the list of active devices. Look for the name of your Mac and match the pairing codes. After doing the same, click ‘Pair’ on both devices. Now your Android device and your Mac have been paired well.

    Also, tap on Pair on the Android device.

    Android to Mac Files Transfer

    Once you pair your device or tablet to Mac, go to the menu bar on your Mac and click on Bluetooth icon. It will display your Android device where you can click Send File to Device. Now you can accept the file on your Android device.

    Enable Bluetooth Sharing to send files to Mac. You just have to go to Sharing option under System Preferences. Now click the box of “On” for ‘Bluetooth Sharing’ in the Sharing preferences pane. You can now set where you can place the download from here and what to do with the transfer request. In general, the files are stored in the Downloads folder.

    After enabling Bluetooth Sharing on Mac, you simply need to head to Android device and click the “Share” icon. The file will be stored in the specified folder on your Mac in Bluetooth Sharing. It is the Downloads folder.

    Bottom Line

    This is all you need to do. You can easily do Android to Mac Files Transfer without using a third-party tool and cable.