Category: How to

WordPress is a favorite blogging tool of mine and I share tips and tricks for using WordPress here.

  • How to use Sound Amplifier on Android 10?

    How to use Sound Amplifier on Android 10?

    Google has always been keen on providing its users with a fresh experience through its Android platform. Be it related to the User Interface, the navigation keys, Multi-Window mode or even the minuscule changes that comes with every Android update.

    From functions for the neophyte gamers to aspiring shutterbug, from functions for the highly sophisticated netizens to sound enhancements for music enthusiasts, Google’s Android has it all. And, with every Android update, it has worked towards increasing the ease of access for its users.

    How to use Sound Amplifier on Android 10

    Today, we will delve deeper into the spectrum of the sound amplifier on Android Q or mostly renowned as Android 10. Sound Amplifiers are present on the Android platform since Android 6 Marshmellow. The idea behind introducing amplifiers was to give users relishing experience when it comes to listening to songs via headphones. It allows users to customize frequencies and strike a balance between foreground and background noise and listen to a more emphasized and pleasing music.

    Working of Sound Amplifier on Android 10

    Well, first you need to know that if your phone has a built-in Sound Amplifier or not.

    For that you need to go to your Settings->Accessibility->Sound Amplifier. If you don’t find this function, don’t panic; just go to the Google Play Store and download it. It basically improvises the sound quality when we tune to play music or even make a phone call. In order to experience this, one needs to plug in the headphone.

    Turning on the Sound Amplifier

    If you have already installed the Sound Amplifier on your device, then follow the below steps to start it.

    1. Open the Settings of your phone.
    2. Click on Accessibility, then on Sound Amplifier.
    3. Now, click on Use service.
    4. You have to allow the permissions here.
    5. Connect the earphones/headphones to your phone.
    6. You are now ready to start the Sound Amplifier.

    Changing the setting of the Sound Amplifier 

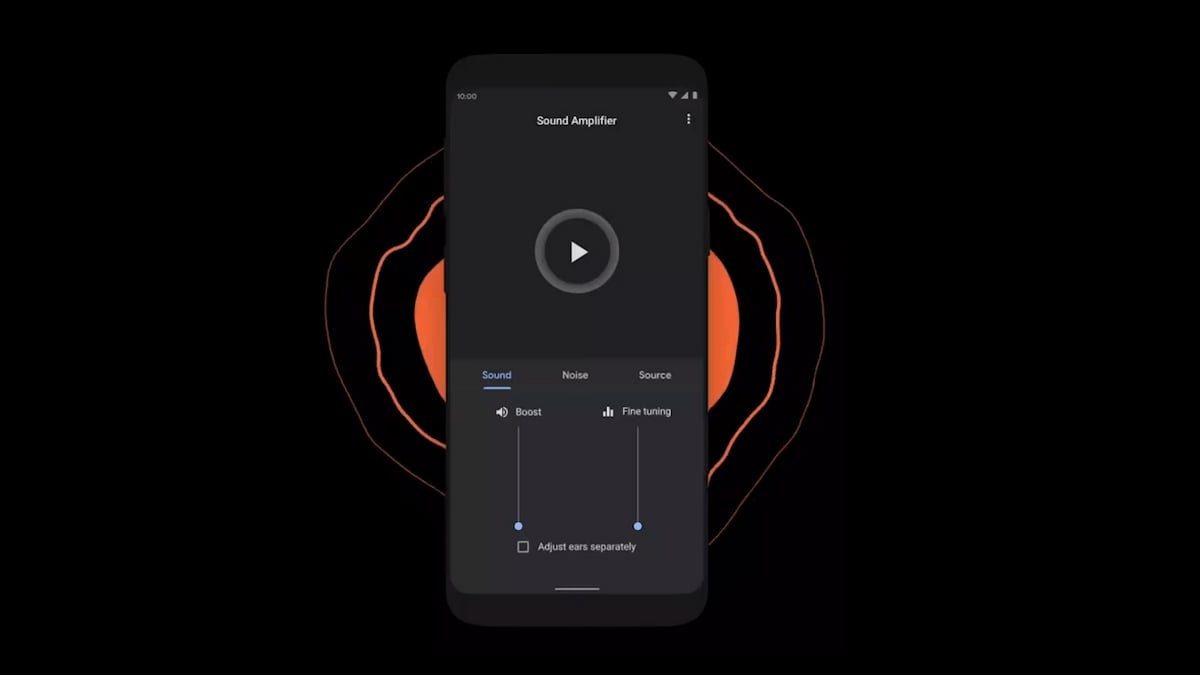
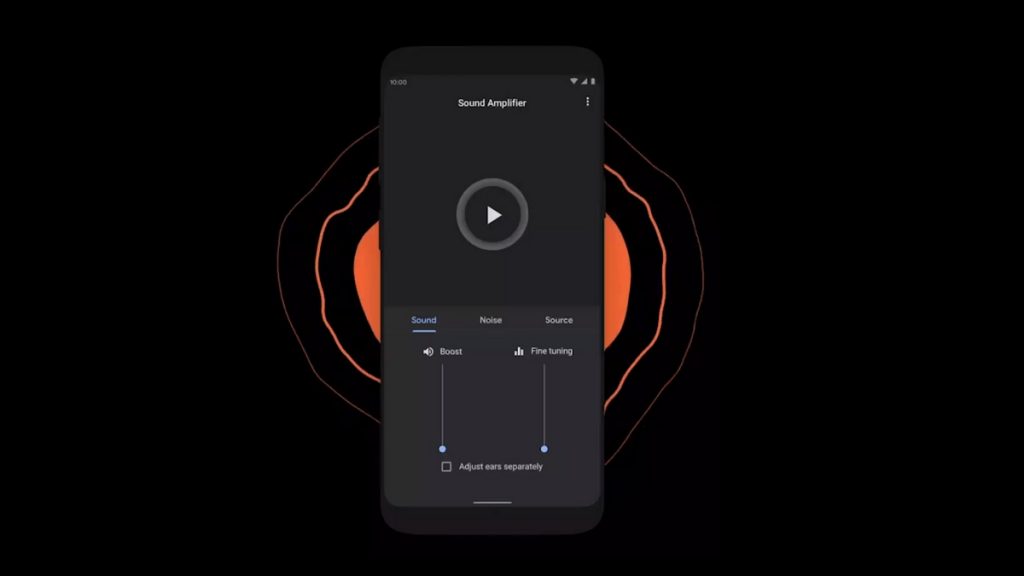
    One can adjust the tuning levels and loudness to fit the environment. Follow the below steps –

    1. On your phone, go to the Sound Amplifier.

    In the settings of Sound Amplifier, you can experiment with these alternatives as per your choice:

        • Click on Pause to pause the amplification.
        • You can also modify the sound settings. Go to the Sound tab. Here, try adjusting the Fine-tuning control and find the best setup for you.
        • On the same tab, you can click on the Adjust ears separately.  It will apply the settings to the right and left audio individually.
        • To reduce the unwanted sounds, click on the Noise tab. Here, you can alter the noise attenuation level.

    The Sound Amplifier comes with multiple functions wherein each ear sound can be adjusted as per users’ needs. The features include sound enhancements with noise reduction along with source selection.

    The features have sub enhancements which as a consequence opens a broader level of sound configuration. More to it is the boost and fine-tune enhancement that comes hand in hand.

    At the end

    More or less, the Sound Amplifier works in a similar way as you apply filters to your photos. The filters beautify the selfies and snaps while the Sound Amplifier filters your sound. Thus, providing you a fresh experience and lets you secluded from the outer world.

    Now, you don’t have to worry about the noise encapsulating you. Whether you are traveling or going for a workout, just plug in your earphones and dwell into your own world.

  • Realme C3 launched in Thailand with rear Fingerprint Sensor

    Realme C3 launched in Thailand with rear Fingerprint Sensor

    Shenzhen-based Chinese smartphone manufacturer Realme has launched C3. It is the sibling with the same appellation that the company launched in India some time ago. But the siblings differ from each other in terms of configuration, specifications, and price in both countries. In India, Realme launched C3 under the tag of ‘Budget Phone,’ while in Thailand, they haven’t attached any such label. In the Thai variant, internal features, camera, fingerprint sensor, memory options are upscaled.

    Realme C3 launched in Thailand with rear Fingerprint Sensor

    Realme C3 Phone Specifications

    Although Thailand’s variant has few commonalities with the Indian version. It comprises a MediaTek Helio G70 SoC CPU, a 6.52- inch screen, as well as a 5,000 mAh battery. However, the differences are that there’s a third camera, along with a fingerprint sensor.

      • The unique feature of the Thai version is the triple rear camera. It has a 12 MP primary sensor, 2 MP macro lens, and 2 MP depth sensor.
      • Aperture f/1.8 is quite an impressive up-gradation along with 4x electronic zoom. As far as the front camera is concerned, there’s no upgrade from the Indian variant.
      • It is the same 5 MP camera with charm and HDR option having an aperture of f/2.4.
      • MediaTek Helio G70 SoC is an Arm cortex A75 CPU with 2 GHZ and A55 single octa-core clusters.
      • It comprises a dedicated Camera Control Unit (CCU), RSC, and EIS features.

    These features specifically improve the video recording performances up to 240fps. As evident, MediaTek Helio G70 and triple camera in the C3 device suit each other well.

    Apart from camera support, G70 SoC also has exciting features such as Accelerated positioning, Dual 4G VoLTE supporting 802.11 connectivity. It certainly improves the phone’s performance over Wi-Fi and high internet speed. G70 provides Integrated voice backup and fast AI-performance, which puts the mobile in competition with other gaming smartphones.

    The most attractive addition is the rear-mounted fingerprint sensor, which wasn’t present in the Indian version. On the software aspect, the smartphone comes with Android 10 with Realme UI 1.0.

    In terms of memory, Realme has launched it with 2 GB, 3 GB, 4 GB, and 8 GB RAM options. Also, there are 32 GB & 64 GB of storage capacity options. The 5000 mAh battery supports reverse charging technology. The whole world is marching towards the USB Type-C charging port. But Realme has continued with USB 2.0 port only.

    Realme C3 Price and Launch Date

    In India, Realme launched it as a budget phone at Rs 6, 999. In Thailand, they’ve launched Thai siblings at THB 3,999 (equivalent to Rs 9,100). With the addition of such interesting features, the new Thai Price seems pretty fair and still holds a good deal. It is available in the Thai online market via Shopee and Lazada from February 20, 2020.

    However, this is the price for only the most-basic variant i.e., 32 GB storage with 3 GB RAM. The smartphone maker has not yet revealed the price of other high-end variants. Notably, Realme has launched C3 in Frozen Blue and Blazing Red colors with backside sunrise design.

  • PUBG Down: PC update 6.2 full patches notes, Shakedown Survivor Pass detailed

    PUBG Down: PC update 6.2 full patches notes, Shakedown Survivor Pass detailed

    Hey, Gamers! All the PUBG lovers out there, got the new update? Yes, it is PUBG 6.2. Here are the necessary details.

    PUBG, basically known as Player Unknown’s Battlegrounds, is a gaming platform. It is a multiplayer game that involves targeting, shooting and winning. The game was found by Chang Byung-Gyu in 2017. The game is known to each and every house in India. It is very popular among kids and youth. The game has been receiving a lot of love, appraisal, and popularity since its launch.

    PUBG Down: PC update 6.2 full patches notes, Shakedown Survivor Pass detailed

    PUBG 6.2 update

    PUBG has recently launched a new update. The game was offline during the development of the update. Player Unknown’s Battlegrounds was offline from 4:30 PM, 18th February to 1:30 AM, 19th February. It was so because the game underwent major changes and had a new update.

    The timings of the shutdown were available on the official website prior to it. The new update is 6.2. It is there on PUBG with patch notes that includes a new map called Karakin. The new update introduces changes in the weapons and ground. Also, it intends to improve the quality of the game.

    PUBG 6.2 Patch notes

    The first and foremost change to the game is the map. The PUBG makers have given a new map called Karakin which is an Island of Northern Africa. It is a map of 64 players with hard terrain and rocky-mountains.

    Black Zone is also one feature available in Karakin. In this, the players are able to ruin buildings into smoke and dust. The intention behind this is to take players out of the safe buildings. The next feature is the Sticky bombs. They can destroy the walls and floors that have breach points.

    Along with this, a new vehicle called a motor glider will also be available in PUBG. It is available on Erangel and Miramar. The motor glider has a lot of features with it including its speed and controls.

    Survivor Pass details 

    There are four modes of missions that will be there in the new update. In Community Missions, everyone can join-in and claim rewards. The other one called the Season Mission has three tracks. The next is the Progress Mission which has a set of daily missions that you need to complete within the given time.

    The Challenge mission is a little tougher than the other three. It has a list of weapons that are very different. These weapons include Skorpion (Handgun), Win94 (SR), QBZ (AR), AKM (AR) and QBU (DMR). All these missions have a lot of features. The details about these are available on the official website of the game.

    In the new update, PUBG is having different gameplay and a lot of new features are there. Map selection, mastery system, pass button, skins and items, replay system are some new features in the 6.2 update. Also, there is an improvement in the quality of the sound, performance, and display of the game.

    All the further related information and details are available on the official website of PUBG.

  • OPPO Reno2 and Reno2 Z review

    OPPO Reno2 and Reno2 Z review

    Oppo owned by BBK electronics is emerging to be a tough competitor among some big brands such as Vivo, Redmi and Real Me. It boasts of great quality and affordable pricing catering to the upper and lower-middle-class group, majorly. It also is famous for its good display, amazing camera and a decent battery back-up.

    OPPO Reno2 and Reno2 Z

    OPPO Reno2 Review

    Oppo Reno series added another model to series in the form of Oppo Reno 2. This phone can be the best option for purchasing due to its massive storage, amazing camera, good charging speed, and fabulous configuration. It will serve as a very good option for a game lover. The cost of the phone is around Rs.36,990.

    Design

    Oppo Reno 2 has a beautiful design with slim bezels all around with the screen covering a maximum of the model.  In the front, there is a 6.5 AMOLED display along with a shark fin module. This module comprises of the earpiece and secondary microphone. It has got the clarity of sound. The touch screen is quick and smooth.

    Oppo Reno 2 Design

    It is available in some beautiful shades such as Ocean Blue and Luminous Black. Ocean Blue is subtle and soothing whereas luminous black is blackish with edges in blue. It is light and easy to carry.

    The volume buttons are on the left whereas the power button is on the right side. The SIM tray is present above the power button, on the right.

    Display and camera

    Oppo Reno 2 features the Snapdragon 730 G Processor which makes it easy and convenient to use. It has 8GB RAM suitable for doing multiple tasks.

    Oppo Reno 2 offers decent pictures with its good camera specifications. The model comprises of a 48-megapixel primary sensor with 20X digital zoom. It also has a 13-megapixel telephoto camera and an 8-megapixel ultra-wide-angle camera. It has a quad-camera set-up with the fourth one being a 2-megapixel depth sensor.

    Battery and performance

    Oppo Reno2 has a decent battery life with a 4000mAh battery. It lasts for one and a half days after regular usage of Google maps, WhatsApp, and a few more apps. With the 20W fast charger, Oppo Reno 2 charges quickly. You can charge the phone’s battery within one hour and 25 minutes.

    Oppo Reno 2 is not a bad choice if somebody wants to play heavy games. Such games will not affect the settings of the phone.

    Oppo Reno 2 is a good model in terms of storage, battery life, looks, and performance. The phone boasts of being a camera oriented one. The quad-camera feature is the perfect reason as to why taking pictures from this phone is amazing. The battery life is an addition to the great features. Being priced at 36,990 this phone is the option that describes the great design, battery life, and performance.

    Oppo Reno2 Z Review

    Oppo Reno2 Z launched Reno 2 Z as a part of its Reno series. It is one of the few phones to include Mediatek Helio P90 SOC.  It comprises of some great features such as fingerprint scanner for better protection, Android 9 Pie, 6.5 Amoled display and many such attractive features. The cost of this phone is around Rs.29,990.

    Oppo Reno2 Z Review

    The phone is a good choice at a price under Rs.30, 000. The features of this model are good enough to satisfy every mobile lover’s satisfaction.

    Design and Display

    Oppo Reno 2 Z comprise of 6.5 full High Definition and Amoled display. It is covered by Black Gorilla Glass 5 on the back and front with 8.7mm thickness. The phone has got curved edges on the sides to facilitate easy handling of the phone. It also has a glossing panel. The weight of the phone is 195 grams yet easy to carry.

    It is available in Sky White and Luminous back shades. Sky White is a soothing shade of white while the luminous black is of shiny black texture. It comprises of bezels on the top with very thin sides.

    Performance and storage

    It has got an 8GB of RAM and 256 GB of internal storage. It provides good storage for a sufficient amount of files, documents, videos, and pictures. The phone is easy to operate. The buttons are quick in response. The power buttons and volume buttons respond quickly. The audio is clear. The touch screen is smooth and quick.

    It is easy to open applications on Oppo Reno 2 Z and the phone runs smoothly. It also offers a pleasant working experience.  You can play some of the heavy games such as PUBG easily on this phone. The other apps will not run slow while playing the games.

    Camera

    Oppo Reno 2 Z comprises of 48MP quad-camera set-up as good as Reno 2. It has got Ultra dark mode, dazzle color, Ultra Steady Video, and a few more features.  The front camera of 8 MP provides portrait mode. The pictures are clear and worthy. It provides good clicks during the day and at night. The color balance is good with beauty mode. You can use the beauty mode feature per your choice. The pictures are good with or without beauty mode.

    One can take great advantage of the phone with such features, especially in terms of camera. There are various modes and four cameras that enhance the picture quality greatly. The pictures shot are natural and attractive.

    Battery

    Oppo Reno 2 Z offers a 4000 mAh battery. It has a decent battery back-up which lasts sufficiently for a day or so. One can easily charge the phone with its fast charger. Within more than ninety minutes, the phone shall be ready to run. After using apps, playing games and other uses, Oppo Reno 2 Z will last till the end of the day.

    Overall, Oppo Reno 2 Z is a great phone in terms of price value.  It is a fantastic looking phone with great battery, amazing storage, and superb pictures. One can easily take great pictures with the quad cameras. The phone provides an amazing scope for taking good selfies and portraits.

  • Redmi K20 Pro Review

    Redmi K20 Pro Review

    The recently revealed Redmi K20 Pro, otherwise known as Mi 9T Pro, is basically the successor to the wildly popular Pocophone F1 by Xiaomi. The regular variant of the smartphone did quite well as well with a good screen, a reasonable battery, and a nice camera. However, it could have had better performance. This is exactly where the Pro version of the phone enters the game. The newer model has a flagship Snapdragon 855 chip, a good upgrade from the Snapdragon 730 that Redmi K20 had. The Redmi K20 Pro runs on the Poco launcher 2 based on MIUI 10 with Android Pie core.

    Mi 9T Pro
    Mi 9T Pro

    The Xiaomi Redmi K20 Pro/Mi 9T Pro has a 6.39″ notch-less Super AMOLED screen protected by Gorilla Glass 5. The 20MP selfies camera is housed behind the pop-up module. This is the latest solution for the notch issue and is being followed by many manufacturers. The rear camera module has a 48MP f/1.8 primary, an 8MP f/2.4 telephoto, and a 13MP f/2.4 ultrawide arrangement. It offers excellent value for money with an amazing processor, a splendid camera, and all the other features we take for granted on a flagship. It doesn’t hurt that is it affordable as well.

    Design

    The Redmi K20 and Mi 9T phones are designed to look extraordinary while featuring amazing specs. The smartphone boasts of an immersive screen with a durable body. The notch-less AMOLED, called by Xiaomi as Horizon AMOLED, makes for a great look. The pop-up selfie camera is the solution to a notch-less display. Now, the K20 Pro users will be able to enjoy using the 6.39″ Samsung-made OLED screen with 1080p resolution without any distraction.

    The phone also features an under-display optical fingerprint reader at the bottom. It is reliable, accurate, and super-fast. The pop-up camera lights up in red as it comes up, making it appear very stylish. The pop-up contains the LED notification lighting. The back of the device contains the same texture as that of the all-Kevlar Pocophone, but it is a mix of gradient hues and patterns. The Xiaomi Redmi K20 Pro/Mi 9T Pro comes with a loudspeaker, a USB-C port, SIM/microSD card, and of course, the 3.5mm audio jack.

    Display

    The Redmi K20 Pro has a 6.39″ Super AMOLED screen that is fully made by Samsung. You may notice that the rounded corners eat up the pixels a bit. The resolution is 2,340 x 1,080 pixels with a 19.5:9 screen aspect ratio. It is one of the most common screens in the market, regardless of the notch’s presence. It covers the DCI-P3 colour space and is completely shielded by a Gorilla Glass 5.

    Redmi K20 Pro Review
    Redmi K20 Pro Review

    With regards to the brightness, the screen’s OLED panel is about 450 nits. It can reach 643 nits in bright light, exceeding the company’s word of 600 nits. The minimum brightness is quite impressive. With pure white colour, it was 2.2 nits. Users can make use of the three contrast settings offered by Xiaomi – default, warm, cool. The standard contrast is as per RGB with an excellent setting for colour accuracy.

    Battery Life

    The Redmi K20 Pro is supported by a 4,000mAh Li-ion battery. It has a Quick Charge feature as well. Thanks to the 18W charger, the phone’s battery can reach 50% in just 30 mins. A full charge, on the other hand, will take about 100 minutes. The screen-on times are quite high and the phone offers nearly 20 hours in video playback. The standby was better with the Mi 9T/K20 variant than on the Pro model, but then the chipset is less power efficient as well.

    Android 9 Pie, MIUI 10.3, and Poco launcher 2.0

    The Xiaomi K20 Pro and Mi 9T Pro smartphone run on MIUI 10.3 ROM based on Android 9 Pie. One difference is that the K20 Pro comes with Poco launcher 2.0 pre-installed. It supports the Always-on display and you can choose if you want to enable, disable, or schedule it. There are also plenty of themes that you are likely to fall in love with. The launch adds a feature-rich app drawer.

    Redmi K20 Pro Back Panel
    Redmi K20 Pro Back Panel

    Audio, Video, and Speakers Quality

    The Redmi K20 Pro smartphone has a single bottom-firing loudspeaker which is quite loud. The output is appreciable at its rich sound, high volume, and detail. It also performed well with an active external amplifier by being extra clear at a very high volume. While the headphone was not nearly as awesome, the accuracy was good enough.

    With regards to the video, the smartphone cam captures video up to 4K @ 60fps. Unfortunately, not all the camera can capture the video. You cannot use the ultrawide snapper for shooting in 4K @60fps. The 2X zoom toggle cannot switch to the telephoto camera at all, meaning you will have to stick to the main camera. The video is sharp, clear, and quite detailed, with no cause for concern.

    Camera Quality

    The Redmi K20 Pro or Mi 9T Pro have the triple-camera at the rear. The main camera has a 1/2″ 48MP sensor with f/1.75 26mm lens that takes 12MP pictures. Other sensors are 8MP (1/4″) telephoto snapper with f/2.4 52mm lens for 2x optical zoom and a 13MP (1/3″) sensor with an f/2.4 15mm lens for ultra-wide-angle shots. The primary sensor here is the Sony IMX 586 while the older one had the IMX 582. While both of them are pretty similar in most respect, the IMX 586 can take 4K video capturing at 60fps.

    Redmi K20 Pro Camera
    Redmi K20 Pro Camera

    The 48MP main sensor has a Quad-Bayer colour filter which basically combines four pixels to help capture more light and reduce noise. The selfie camera is a 20MP one on a motorized pop-up module. The pictures are sharp, detailed, and rich in colours. Unfortunately, there is no autofocus available here. Despite the lack of a depth sensor, the camera takes pretty good pics with blurred backgrounds.

    Verdict

    Xiaomi’s latest Redmi K20 Pro / Mi 9T Pro smartphone is one of the best releases this year. While it is not called a Pocophone, it features everything and more than the phone would have. Redmi K20 Pro is what the phone is called in India while the other regions know it as Mi 9T Pro.

  • Huawei Unveils Crush Green Nova 5t

    Huawei Unveils Crush Green Nova 5t

    Huawei revealed its new device named Nova 5T in August 2019, and the phone appeared in the market in September. It has got some marketplace since then, so what’s more exciting than launching a new color shade in the same series. Fascinating right?

    Nova 5t Crush Green

    This is a technique almost every Smartphone maker adapts in order to keep their demand in the market still. Therefore, Huawei revealed a brand-new color for Nova 5T. The all-new crush green Nova 5T is the most amazing and eye-catching shades of the series. The phone also comes in different colors like midsummer purple, black, and crush blue.

    As far as the specifications and features are concerned, there are no distinctions in all the phones except for the color variation. The specifications stand the same in all the above shades. The touch screen is exactly the same 6.26’’ 1080 x 2340IPS with a left-aligned punch hole for a 32 MP selfie camera.

    It has 6/8 GB RAM, 128GB non-expandable storage. The phone comes with a quad-camera arrangement: 48 MP primary cameras, 16MP ultra-wide, 2MP macro cam, and a 2 MP deepness sensing unit. The device has a 3,750 mAh battery and currently runs on EMUI 10 with Android 10.

    Know Something More About The Huawei Nova 5t

    The Nova 5T is Huawei’s second phone in the Nova series to come out in 2019. It came out at a time when most of the top brands, including Huawei, were just launching their top graded phones with some impressive specifications. Huawei is aiming towards offering devices within a budget to keep the market value still.

    The Nova 5T looks like a great deal. It comes with a quad-cam arrangement and a Kirin 980 processor within the best price range. Though it is a great deal, Nova 5T is still not into the list of the premium mobile phones.

    This is because you won’t see specifications like wireless charging, expandable storage, OLED screen, or water resistivity. But, if you are okay with the basics and are not looking for the extras, you can go for it. If you crave an excellent camera quality, this phone is just a perfect pick for you.

    Design

    The Nova series has successfully refreshed the brand. They have come up with Midsummer Purple with a shimmery finishing, which makes it look just perfect. The all-new crush green color variant is the latest talk of the town. You will find a newly minted Nova monogram in an eye-catching reflective finishing on its 2.5D glass-clad backside.

    The glass finish catches fingerprints quickly with the slightest touch, but the reflective light camouflages it all. Turn the phone, and you will find a large 6.26-inch display. The beautiful design of the phone gives a good in-hand feel.

    The Nova 5T comes with a 4.5mm punch hole at the top left corner, which gives the phone a screen to body ratio of 90%. There is a mounted fingerprint scanner on the right side of the device. It also works as a power button and unlocks the phone within a fraction of seconds.

    The phone is worth its price as far as the specifications are concerned. If you are fond of photography, this one is undoubtedly your type.

  • How to remove the Google Search bar from any Android home screen

    How to remove the Google Search bar from any Android home screen

    Google is one of the biggest tech giants in the world. It provides information and other services from daily life to world-class technologies. It is transforming itself day by day. The evolution of Google leads up to the epitome of technology. Google not only provides search engine services but it launches its smartphones and making a mark in the smartphone business.

    How to remove the Google Search bar from any Android home screenAndroid is a subset of Google. Nowadays, Android smartphones are the most running smartphones in the world. The establishment of Android in the market is considerable. It provides a search bar on the home screen of every smartphone.

    Reasons to remove

    Google tries to provide the best of its facilities to its users. Consequently, it launches a mic bar on the right corner of the Google Search bar. It provides a facility to search the information through voice mode. One can speak to it and can search whatever the information they want. Google comes up with a feature of Google Assistant. It will provide most of the assistance one might need.

    It provides the Google Search bar on the home screen of the phone which at times becomes the cause of concern. The bar takes a lot of space on the home screen which can you can use for several other purposes. If we are able to remove the Google Search bar from the home screen, we will be able to put many icons in the place of it. This is one of the biggest reasons that one needs to remove the Google Search bar from the Android home screen.

    How to remove it?

    The process to remove the Search bar varies from phone to phone. But it is not a difficult task. At times, one just needs to press the bar for a bit long and the bar pops up the remove or the hide option.

    Most of the time the cause of concern becomes the space it takes on the home screen. So to minimize the space, one can also reduce or minimize the space by taking a suitable option.

    There are some examples of how to remove the Search bar. Like in Samsung, one just needs to long-press the bar, and it pops up with an option to remove it just like another widget.

    But in Sony Xperia it is different. It basically hides it in a different way. On Huawei handsets, one just needs to go to their home screen and long-press the Google Search bar and drag it to top of the screen. Once you leave it, it will disappear automatically.

    Bottom Line

    One can also use disable settings and disable the Google app. This is one of the alternatives to removing the Google Search bar from the home screen. By rooting your Android phone you can also remove the Google Search bar. But this might affect the warranty guidelines of the smartphone.

    So the problem of taking space by Google search bar can be resolved through several means and the remaining space can be used for other useful purposes.

  • How To Easily Share WiFi Passwords On Android

    How To Easily Share WiFi Passwords On Android

    So, have you ever wondered how you can share the Wi-Fi password effortlessly instead of painstakingly spelling it out? When your friends or family visits your home, it is quite likely that the first thing they are going to ask you is your Wi-Fi password. Thank your lucky stars that there is a much easier way to Share WiFi Passwords. This is by creating a QR code that will allow your friends to connect to the wi-fi network.

    Easily Share WiFi Passwords
    Easily Share Wi-Fi Passwords

    There are plenty of QR code generating apps that you can use for this. Once you have created a code and added the necessary details, simply share the code and the person will be able to connect. You don’t need to generate a code every time you want to tell someone your password. Create the QR code once and save it safely somewhere. Reuse the same one every time you want to give someone the Wi-Fi password. So, just how do you go about doing that?

    Your SSID & Network Encryption Type

    Before jumping on to QR codes and the like, find out your SSID and network encryption type. SSID, or service set identifier, is your Wi-Fi network’s name. If you don’t know the SSID, go to the Settings menu on your phone and look up Wi-Fi connections. Check out the name of the network that you are connected to. Do note that SSIDs are case-sensitive. This means that you will need to keep an eye on upper and lower cases. Next, find the Network Encryption Type. For this, simply tap on the SSID which will then show your Network Encryption Type on the next screen. Keep both the details safely.

    QR Code Generator

    There are plenty of QR code creator apps in the Play Store. The one named QR Code Generator is a pretty reliable one. Download and install the app.

    Share WiFi Passwords
    Share Wi-Fi Passwords

    Once done, you are now ready to create a code for your Wi-Fi network. Most apps will create a QR code for texts by default. For others, you will have to make the change. For our mission, choose Wi-Fi. Enter your SSID, password, and the network type. The app will not authenticate anything, so you will have to make sure that you have entered the right details. Once done, simply tap on the ‘Generate’ button.

    Share WiFi Passwords

    Once the app has generated the QR code, you can download the same as a PNG image file. Some users may be required to grant app permission for storage. Save the QR code. Once done, it will be stored permanently on the phone.

    Every time you want to share the code, simply pull it up from the storage. Get your friend or family member to come closer and use their camera to scan the code. They will immediately receive a notification for connecting your network. Tap ‘Join’ and you are done! If you might not be there when your guests need access, simply print out the QR code and stick it somewhere discreet so that they can scan it when they require it.

  • How To Save Battery On Samsung Galaxy S10e, S10 And S10+

    How To Save Battery On Samsung Galaxy S10e, S10 And S10+

    Samsung devices are not really known for their battery lives. Smartphones, such as Galaxy S10 and Galaxy Note 9 take a lot of time to charge up. Another issue is that they also tend to use up the battery quite soon. This is all the more true if you have enabled other features of the phone. However, if you know some tricks, you can save battery and extend its life.

    #1 Night Mode

    A good thing to do would be to enable the Night Mode. Since the Galaxy S10 series uses Super AMOLED displays, you can easily use it to achieve longer battery life. One excellent way would be to enable the system-wide dark mode. Since the Light Mode uses more pixels, it uses up more battery. Besides this, you can also choose to get AMOLED wallpaper apps that help you save battery while looking ultra-cool.

    Samsung Galaxy S10 Series
    Samsung Galaxy S10 Series

    #2 Disable Always On Display

    While the Always On Display is a cool option to enable, keep in mind that it can easily suck battery. It is a good idea to switch it off on your S10/S10 Plus so that you can make your phone last longer. If you don’t want to remember to do it every time, how about setting a schedule for it? You can set it to enable and disable itself.

    #3 Adaptive Battery

    The adaptive battery is a relatively new feature is seen in the Galaxy S10 series. This element makes use of machine language to understand your phone habits and usage. Based on the same, it will disable apps that you don’t really require and the apps that use up a lot of battery. One thing to note here is that the process does not start immediately. It takes some time to understand your usage and then decides to disable the apps. The phone will categorize the app into different options, such as Active, Frequent, Working Set, Rare, and Never.

    How To Save Battery
    How To Save Battery

    #4 Power Modes

    One of the best things you can do is to enable the power mode on your phone. On the Galaxy S10 device, there are three modes – High performance, Medium power saving, and Maximum Power Saving. In most cases, you can choose the one that suits you so that you are able to get the best out of it.

    #5 Optimize Settings

    You may be pleased to know that Galaxy S10 and S10 Plus come with battery optimization features that enable automatically when you are not using the device. It is designed to reduce the screen brightness, media volume, and the screen timeout automatically. You can make changes on the Settings menu by visiting the Optimize Settings tab. Here, you can also choose if you want to put unused apps to sleep.

    #6 Reduce Screen Timeout

    You can also check out the screen timeout settings. If you generally don’t bother locking the phone, enabling this feature could help you save energy. Usually, a 30-second screen-on time is considered ideal.

  • iQOO 3 Phone officially teased, will come with UFS 3.1 storage

    iQOO 3 Phone officially teased, will come with UFS 3.1 storage

    iQOO is a mobile range by Vivo. It is an electronic gaming smartphone. Vivo has not yet released any smartphones of iQOO range, but it has officially announced the release of its first iQOO smartphone. Vivo will be launching its first iQOO smartphone on 25th February 2020.

    iQOO 3 officially teased, will come with UFS 3.1 storage

    The debut smartphone of the iQOO series in China and India is iQOO 3. It will be a phone with the fastest network in India. iQOO is a Chinese handset and will have a 5G networking system. It is gathering a lot of attention and is spreading all over India.

    People are excited to have a look at the new Chinese handset. The company, however, will be launching the smartphone on online platforms only. The physical launch will not take place due to the coronavirus outbreak. The Indian ace cricketer Virat Kohli will be the brand ambassador of the new smartphone from India.

    Structure and display of iQOO 3 Phone

    The new iQOO 3 handsets by Vivo will have a 5G network technology and will be the fastest working smartphone ever in China and India. It has a dimension of 6.25 X 2.95 X 0.36 inches and has a weight of approximately 214.5 grams.

    It has a glass front and back with a frame made up of aluminum. The phone has a Super AMOLED touchscreen with 1080 X 2400 pixels. It will be launching with dual- sim technology. This smartphone is launching on the Android 10 OS platform with a fingerprint feature in it.

    Features of iQOO 3 Phone

    The Vivo smartphone iQOO 3 will be having the fastest battery charging system with a non-removable Li-Po 4400 mAh battery.

    • It will be available in different colors, with a memory of 128 or 256 GB.
    • iQOO has already confirmed that the smartphone will have a Snapdragon 865 SoC, fast UFS 3.1 storage.
    • It will have a RAM up to 12 GB, which turns out to be one of the most important features of the smartphone.
    • Along with this, it has a quad-camera that has a sensor of 48 megapixels. And with this, it will also have a selfie camera of 16 megapixels.
    • It has a 4,370 mAh battery along with all its other features. It has a battery with a fast charging technology of 55 watts.
    • iQOO will be sold with a pair of earphones.
    • It will also have a few sports features associated with it like accelerometer, heart rate measurement, etc.
    • Also, it will have sensitive buttons for gaming.

    Along with China, it will be releasing in India. It is making the gadget-lovers go wild with anticipation and waiting.

    Conclusion

    The new gaming smartphone will be available for a price of INR 40,000 in India. It will be available on the official website of iQOO. The smartphone has a lot of features in it and is completely worth buying. In case you wish to get the smartphone, you can order it online from the official website of iQOO.